Collaboration Bus - User Documentation
Copyright (c) 2005 -
Cooperative Media Lab
Author: Nicolai Marquardt
Table of Contents
- Introduction
- Requirements and Installation
- Getting Started
- Create a new Pipeline Composition
- Edit pipelines
- Sharing
Introduction
Sensor-based infrastructures provide base technology for sensing information, for processing the captured data, and for adapting the behaviour. In the Collaboration Bus project we developed a graphical editor that allows end-users to control system behaviour by specifying information flows from selected sensors and sensor data to the envisioned system reactions. In this user documentation we guide you through the installation of the software and give you an introduction of working with the Collaboration Bus software.
Requirements
- The current release version is for Mac OS X only (because of the integrated actuator components, growl notifications, AppleScript shell execution and the interface enhancements with the Quaqua library). Supported and tested Mac OS X versions are 10.3.x and 10.4.x.
- Java 1.4.x or Java 5.0 is required. At the official Java website of Sun
 you can find the download for the current Java runtime environment.
- Sens-ation server, Release 2. This is the server instance to handle connected sensors and provides various gateways for clients, e.g., AXIS, XML-RPC or CGI. For download and installation instructions please go to the Sens-ation Project Page
- For the desktop notifications you need Growl 0.7. Growl is a global notification system for Mac OS X. For more information and installation instructions please go the website of the Growl development team.
- For relay board controlling: you need the relay board hardware and a driver (we use an XML-RPC controller developed by Tareg Egla of the CML). Download link will be available soon.
Getting Started
- Download the Collaboration Bus JAR package (BSCW).
- Extract the ZIP file to your local HDD.
- Start the software with a double click on the CollaborationBus.JAR archive.
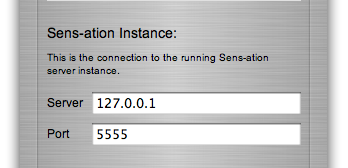
- You see the login window of the control panel. Please switch to the server settings and change the Sens-ation server if the server is not at your local system (cf. Figure 1).
Figure 1. Server connection preferences.
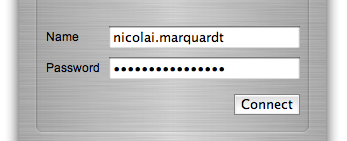
- Switch to the user login screen back and type in your login information (cf. Figure 2), or select the "guest" account from the user select buttons. Then press the conenct button.
Figure 2. Enter your login information.
- The control panel application connects to the repository server instance and retrieves the repository data of the current user.
- If the connection was successful, the view panel changes to the repository view, and you can see the current pipeline compositions in the repository.
- Now you can create new pipeline compositions, or edit the exisiting ones in the repository.
Create new Pipeline Compositions
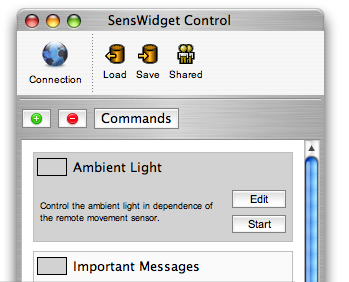
- In the control window of your personal repository you see the available toolbar, the add, remove and command button (cf. Figure 3).
Figure 3. User interface of the control application.
- Press the add button
 to start the assistant dialog for creating new pipelines.
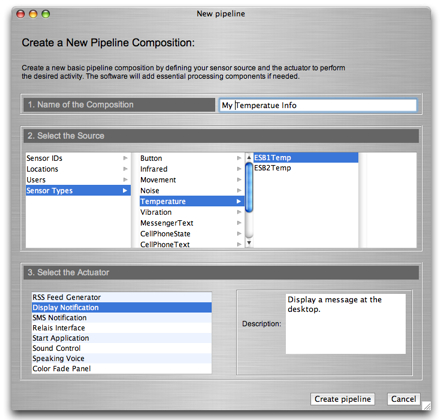
- Now the dialog window appears, where you can type in the name for your composition (e.g. "My Temperature Info), select the sensor (e.g., ESB1Temp, a temperature sensor of the ESB board) and the desired actuator method (e.g., display a message on the desktop):
Figure 4. Create a new pipeline composition with the assistant dialog.
- Click the "Create pipeline" button, and the system wil create the basic composition of one sensor source and one actuator element and add it to the repository.
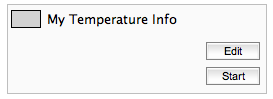
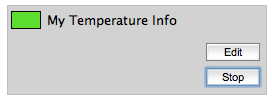
- Now you can see, that the new pipeline composition has been added at the end of the repository view (cf. Figure 5). You can start the simple pipeline by clicking the "Start" button, and all the incoming events of the temperature sensor will be displayed at your computer system.
Figure 5. Control view of the pipeline composition.
- This is the first pipeline of your repository, but you can easily add new pipeline compositions or edit existing ones. Let us now look, how we can add a filter component to our first pipeline.
Edit pipelines
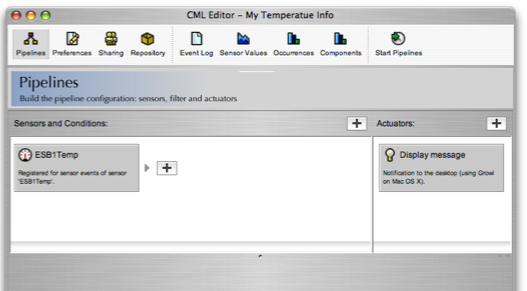
- Start the editor window by clicking the "Edit" button in the personal repository view. The Collaboration Bus system will create a new instance of the editor view (cf. Figure 6).
Figure 6. Editor window with the current components of the pipeline composition.
- In the toolbar (cf. Figure 7) of the editor window, the first four buttons switch between the four views of the editor window: pipeline view, configuration settings, sharing and repository source view. The other buttons are for the realtime data visualizations: open bar visualizations of incoming events, start and stop the pipeline, etc.
Figure 7. Toolbar of the editor window.
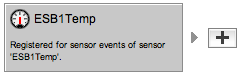
- To add a new filter component to your pipeline, select the "+" button at the right side of the source sensor (cf. Figure 8).
Figure 8. The first component of the pipeline: the source sensor.
- In the dialog window select the desired filter component (e.g., "Threshold Filter").
- The component will be displayed in the editor pipeline view.
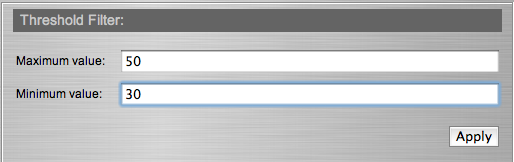
- Click at the "Threshold Filter" box, and in the lower part of the editor window, the preference panel (cf. Figure 9) will apear.
Figure 9. Preference panel of the threshold filter.
- Type in the settings of the range of values you are interested in, e.g., maximum value 40 and minimum value 30.
- Click "Apply", and the settings of the component will be added to the composition (cf. Figure 10).
Figure 10. The pipeline composition with the added filter.
- Now we have the pipeline initialized with the new filter. Only values in the range between lower and upper limit will pass the pipeline and therefore displayed at the desktop. Now you can easily add more filters to the pipeline, just add them at the end of the current pipeline. You can also add more actuator components, just click the "+" button of the actuator view at the right side of the editor.
- To test the pipeline, click the right button in the toolbar "Start Pipelines" (cf. Figure 11), and so all components will be started. You can also view the incoming events with the chart visualizations.
Figure 11. Toolbar buttons for the realtime tools: event list view and visualizations.
Sharing
- The Collaboration Bus software has an integrated mechanism to share your created pipeline compositions with other users, and to integrate their shared compositions as well.
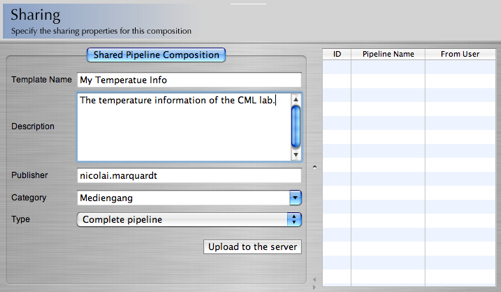
- To share our new created pipeline composition, open the editor view and select the tab "Sharing" (cf. Figure 12).
Figure 12. Sharing view of the editor window: upload composition to the shared repository server.
- You can insert some additional information of the shared composition (name, description), and you can also choose if the composition will be available as it is (with all actuator and sensor information), or just as a template (without sensor information and actuators, just the filter components and their configuration).
- Please click the "Upload to the server" button, and the repository will be stored in the shared repository of the server.
- If other users want to use your shared pipeline composition, they have to click the "Shared" button (cf. Figure 13) in the control interface.
Figure 13. Activate the shared repository view in the control user interface.
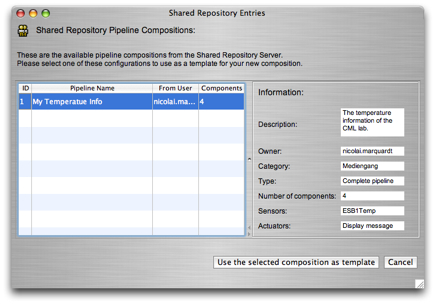
- In the next dialog window (cf. Figure 14) you can see all available shared pipeline compositions, and you can select the entries of the table to see some further information in the information panel at the right side of the dialog.
Figure 14. Shared repository view with all available pipeline compositions.
- Choose your desired composition, and click "Add the selected composition as template". The application instantiates a new pipeline composition and add it to your personal repository.
For further questions please contact Nicolai Marquardt (nicolai.marquardt@medien.uni-weimar.de).


![[hide]](javascript:icntoggle('mod-CML_Affiliation','mo.png');)
![[hide]](javascript:icntoggle('mod-CML_Module','mo.png');)
![[hide]](javascript:icntoggle('mod-Internal_Module','mo.png');)
![[hide]](javascript:icntoggle('mod-login_box','mo.png');)
![[hide]](javascript:icntoggle('mod-who_is_there','mo.png');)
![[hide]](javascript:icntoggle('mod-mnu_application_menu','mo.png');)